World War I · 1915 ·
Gallipoli 1915: Monumental Failure with Lasting Repercussions
Churchill's gambit to force the Dardanelles failed at every level — naval, amphibious, operational, and strategic. The wreckage redrew the Middle East and a Turkish colonel became a nation.
- Outcome
- Strategic
- Belligerents
- British Empire (BEF, ANZAC) vs. France vs. Russian Empire vs. Ottoman Empire vs. German Empire
- Commanders
- Ian Hamilton · Winston Churchill · Lord Kitchener · Liman von Sanders · Mustafa Kemal · Esat Pasha
The Western Front, composed of static trenches that began in Belgium and extended to Switzerland by 1915, became a setting for massive losses and human misery for both sides. Churchill, who at the time was the First Lord of the Admiralty, wanted to get the Navy into the fight and proposed opening a new front. This would lead to the Gallipoli Campaign in the spring of 1915. From the start, the plan was doomed to fail. Gallipoli, despite Great Britain’s intentions, would prove to be a monumental failure with repercussions that extend to today.
There were several reasons why Gallipoli was chosen. First, as previously mentioned, Churchill wanted to relieve some pressure on the Western Front as well as get the vaunted British Navy into the war. This would also help protect Britain’s interests elsewhere, such as the Suez Canal. The next reason was the Allies needed the Russian grain from Ukraine. To do this, they needed to enter the Black Sea through the only way possible: the Dardanelles, which was firmly under Turkish control. Russia, in the meantime, also needed support in the form of arms and munitions.
Gallipoli is a case study in failure. Though war planners before the war discarded a Dardanelles campaign as impracticable, Churchill ignored this and pushed for the use of Naval forces only to force the Dardanelles Straits open, instead of a combined arms approach using the army and navy. There were multiple problems with this. Instead of top-of-the-line warships, they used older vessels that lacked technical advances the newer ships had at the time. The Germans and Turks also had the strait well protected by forts with heavy guns and had mined the harbor. This would be a formidable task.
The Naval Phase
The plan was to run their battleships and cruisers into the strait to pummel the forts and positions guarding the straits. While they did this, the minesweepers would sweep the waterways and clear the path to Constantinople. This plan was set up in four phases.
Phase one would take place on 19 February 1915. From 12,000 yards, the warships of the British and French navies blasted the forts at the mouth of the Dardanelles Strait and successfully destroyed them. Unfortunately, the next phase was delayed due to foul weather, but on 26 February 1915, a detachment of Royal Marines landed and further demolished the pummeled forts with explosives. Minesweeping operations began, and daily the perilous operations of clearing mines happened under the supportive guns of the accompanying battleships. Marines would be landed again on 4 March, but this time they were met by stiff resistance. Air patrols would also report that the Turks were replacing the guns where the others had been destroyed.
The final phase of the plan was launched on 18 March: battleships entered the strait and began pounding the defenses. The Turks returned fire. As the guns dueled, the French battleship Bouvet was sunk by a mine, followed by the British battleships Irresistible and Ocean. The fleet turned and retreated. The naval action had failed.
The Landings
It was then decided that it would be the Army’s turn. Under the command of a well-experienced General Sir Ian Hamilton, a force of 81,000 with 178 guns would land on the Gallipoli peninsula. This mix of British and French units would land on 25 April 1915. These units would include Australian and New Zealand volunteers, where they would make a name for themselves.
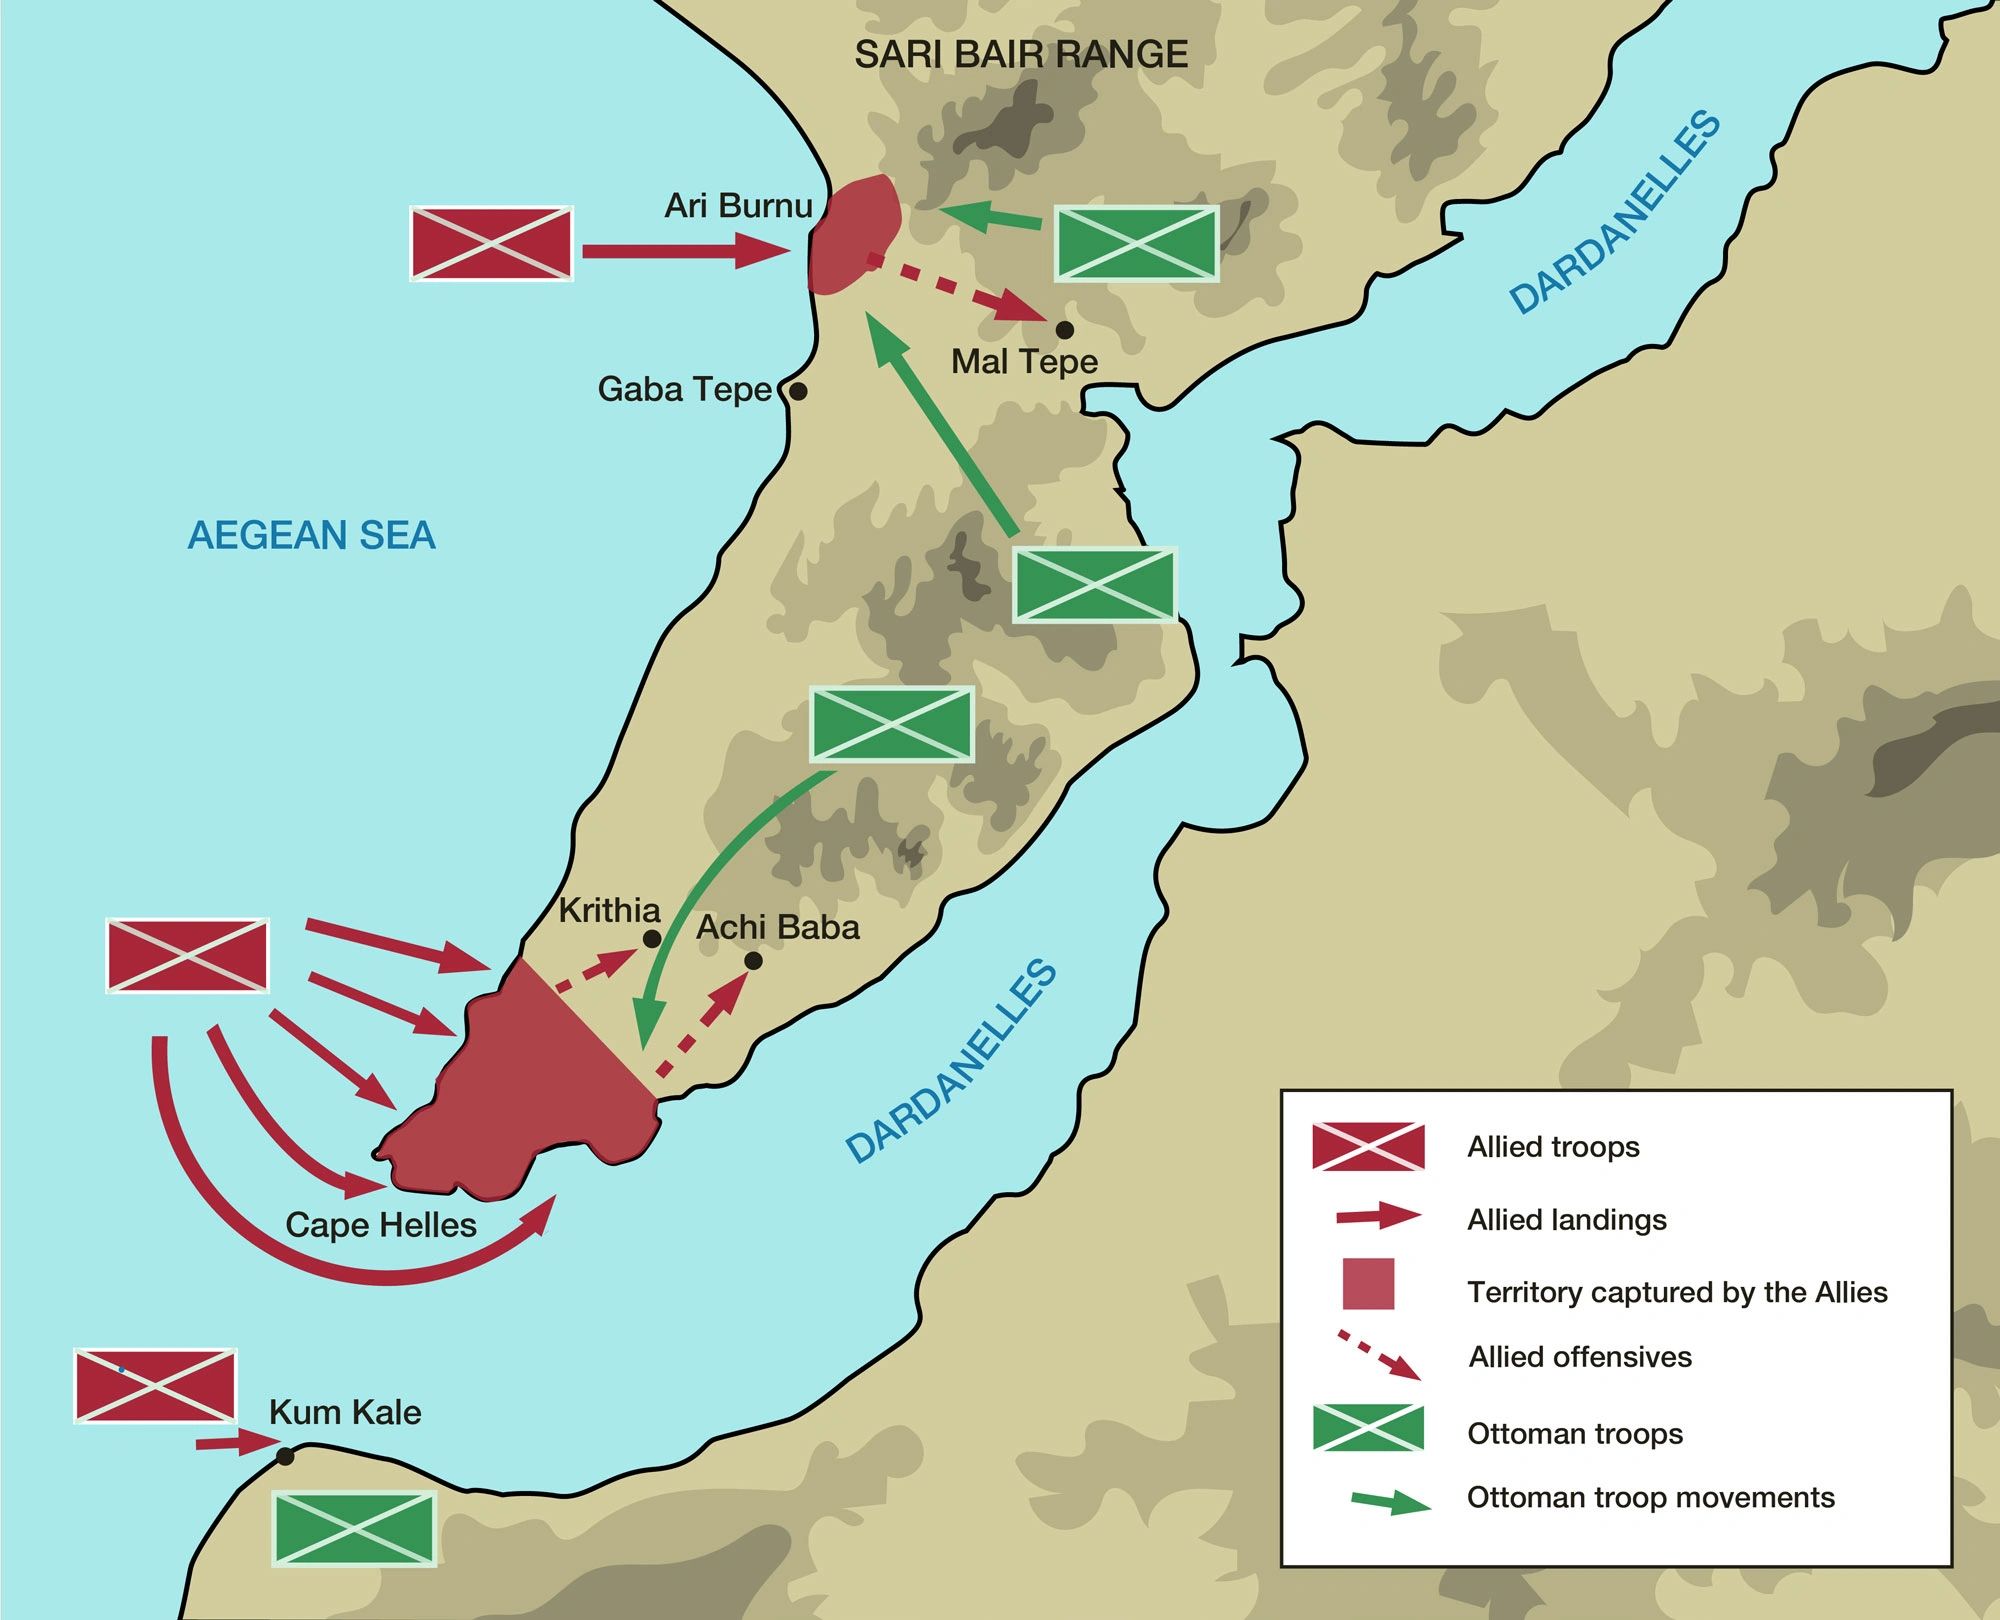
The invasion was a mess. Before it even happened, Lord Kitchener was against it and provided minimal troops and follow-on support. He placed Sir Ian Hamilton in command and he developed a plan. The British 29th Division was to land on the southern tip of the peninsula known as Cape Helles, on beaches denoted as “X, W, V, S, and Y.” The main push would be at “X, W, and V” beaches located on the peninsula’s tip while a portion of the division would land at the “Y and S” beaches as a means to flank the Turks defending the beach. Across the strait, French forces would land as a diversion while the Australians and New Zealanders (known as ANZACs) would land north at Gaba Tepe.
On the defense, the Turkish 9th Division were deployed to defend Cape Helles. The 19th Division were stationed in the center of the peninsula, and the 5th and 7th divisions in the north. German General Liman von Sanders was in overall command, with very capable subordinate leaders in Lieutenant Colonel Mustafa Kemal and Lieutenant Colonel Esat Pasha. In total, the force landing on Gallipoli would meet approximately 62,000 Turks, mostly peasants with German officers leading them.
The ANZACs’ initial assault began in the early morning hours on 25 April 1915. They were ferried ashore in a line of rowboats towed by a steam-powered boat. These boats, holding roughly 30 men, would then row the last hundred yards to the beach. This they did under the cover of darkness, and would land on the beaches. By the time the sun rose, 4,000 men had landed. It was then that they discovered that they were in the wrong location and confusion set in. These men overcame and pushed inland with little resistance. Moving inland they met the Turkish defenders and a fierce firefight ensued, and they would be stopped on the second ridgeline short of their day’s goal.
Cape Helles landings were also largely unopposed, except at “V” and “W” beaches where the Turks opened fire as the boats landed. British soldiers were cut to pieces as they made their landings. Once the Turks knew where the landings were, they rushed units to set up positions on the high ground and stopped the invasion cold. Then the warfare devolved into the same stalemate as experienced on the Western Front. Several more offensive attempts were made with little success if any. The last would be on the 7th of August when a landing attempt at Suvla Bay was thwarted by the Turks. This would be the last offensive.
Withdrawal and Hell
The only operation that went well for the British forces was the withdrawal. Using deception and the cover of night, beginning mid-December they began evacuating the haggard forces from the beach. The final souls removed from the hell that was Gallipoli would depart on 9 January 1916. The hell that was Gallipoli had ended.
The terrain on the Gallipoli peninsula was not conducive to infantry action. Covered with tall ridges and scrub, movement and fighting was difficult for both sides. The advantage, however, was on the Turk side as they had home field advantage and shorter supply lines. Add to the difficult terrain the lack of fresh water, blistering heat, and flies, and this was a hellscape like no other. Bodies could not be buried. John Murray writes:
“Of course we managed to bury some, but most were out of reach. Within a matter of hours, the corpses that are exposed to the sun swell to an incredible size. Whatever nationality they are, they remain where they fall until we advance through them.”
He also describes the horrendous flies that are ever present, infesting everything. These men also suffered the various diseases that come along with such conditions.
Lessons
In the scope of this discussion, the surface was barely scratched on this campaign. There are hundreds of lessons to be gleaned from this period of the “Great War.” There were failures at every point. The naval action from February to March telegraphed exactly what they were going to do. Then an overconfidence in British naval power added to its failure. The landings were poorly planned and supported throughout the adventure. They also lacked aircraft for reconnaissance, fire support, and logistical support to keep the men supplied with food, water, etc.
The failure at Gallipoli would have many ramifications. Churchill would lose his position as First Lord of the Admiralty and go on to command a battalion on the Western Front. The campaign made a name for Australia, New Zealand and Turkey. The successful defense of Gallipoli would boost Mustafa Kemal’s reputation and after the war he would become known as Mustafa Kemal Atatürk, the first president of the newly independent Turkey. On a wider stage, the defeat at Gallipoli would also lead to the breakup of the Ottoman Empire as a whole and the formation of the Middle Eastern countries we are familiar with today such as Iraq and Syria. The turmoil that rages in the region can be traced all the way back to these events in the First World War. Strachan writes, “what militated against evacuation from Gallipoli was not the effects within Turkey but the wider political ramifications within the Muslim world.”
With the lens of hindsight, I think that the Gallipoli adventure was not a good move. It was a waste of lives and treasure whose weight on the Western Front may have done more good. If it needed to be done, then they should have sent a force sufficient to make a forced landing. They should have also planned better, trained for it, and developed their leaders better. And finally, they did not know their enemy, and like the Schlieffen Plan, felt that they were superior to the Turk warrior — and that underestimation ruined their day.
Bibliography
Broadbent, Harvey. “Completing the Story of the Gallipoli Campaign: Researching Turkish Archives for a More Comprehensive History.” Journal of the Society for Army Historical Research 85, no. 343 (2007): 208–23.
Doyle, Peter, and Matthew R. Bennett. “Military Geography: The Influence of Terrain in the Outcome of the Gallipoli Campaign, 1915.” The Geographical Journal 165, no. 1 (1999): 12–36.
Hickey, Michael. Gallipoli: A Study in Failure. London: John Murray, 1995.
Murray, Joseph. Gallipoli 1915. London: Silvertail Press, 2005.
Patton, George S. The Defense of Gallipoli. General Staff Study, Headquarters Hawaiian Department, 1936.
Prior, Robin. “The Strategy Behind Gallipoli: Strategic Decision-Making in the Dardanelles and Gallipoli.” Australian Strategic Policy Institute, 2005.
Strachan, Hew. The First World War. New York: Viking, 2004.
Travers, Tim. “The Ottoman Crisis of May 1915 at Gallipoli.” War in History 8, no. 1 (2001): 72–86.
Westmacott, Rupert. “Gallipoli 1915: Reminiscences.” Journal of the Society for Army Historical Research 68, no. 276 (1990): 243–52.
Originally published at the live site .